Adding DNS records in Namecheap is a straightforward process. Log in to your Namecheap account, go to the “Domain List” page, and click on “Manage” next to the domain you want to update. In the left-hand sidebar, select “Advanced DNS.” Scroll down to the “Host Records” section and click on “Add New Record.” Enter the details for the new DNS record, such as the host, type, and value. Click “Save All Changes” to complete the process.
Have you ever wondered how to add DNS records in Namecheap? With Namecheap’s user-friendly interface and comprehensive support, managing DNS records has never been easier. Whether you’re a website owner, a developer, or an IT professional, Namecheap provides the tools you need to efficiently add and manage DNS records for your domains. Don’t let the technicalities of DNS records overwhelm you. Follow these simple steps to effectively add DNS records in Namecheap and optimize your domain’s performance.
When it comes to adding DNS records in Namecheap, you can trust the reliability and expertise of one of the leading domain registrars in the industry. With a rich history spanning over two decades, Namecheap has been empowering individuals and businesses to establish their online presence seamlessly. Adding DNS records is crucial for managing various aspects of your domain, such as pointing your domain to a specific server or configuring email services. By leveraging Namecheap’s intuitive DNS management tools, you can effortlessly add and modify records such as A, CNAME, MX, TXT, and more. Keep your domain’s DNS records in check and ensure smooth functioning of your online services with Namecheap’s user-friendly interface.
Understanding DNS Records in Namecheap
DNS (Domain Name System) records are essential components of managing your domain’s online presence. They serve as a translation system, converting easy-to-remember domain names into IP addresses that computers can understand. DNS records contain information about your domain, such as its registered name servers, email servers, and other associated services.
In this article, we will explore how to add DNS records in Namecheap, a popular domain registration and management service. Namecheap provides a user-friendly interface and comprehensive DNS management tools that allow you to configure various record types to optimize your domain’s functionality. Let’s delve into the process of adding DNS records in Namecheap.
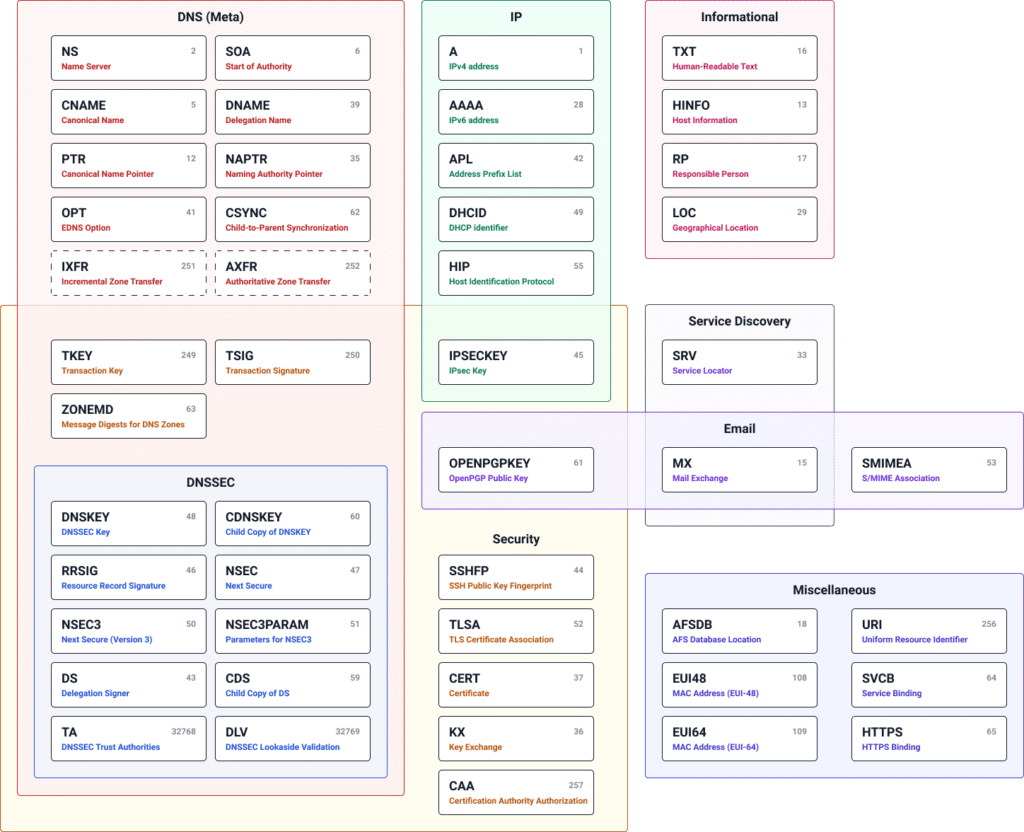
Before we dive into the details, it’s important to understand the basic DNS record types you might encounter:
- A (Address) Record: Maps a domain or subdomain to an IP address.
- CNAME (Canonical Name) Record: Redirects a domain or subdomain to another domain name.
- MX (Mail Exchange) Record: Specifies the email server responsible for handling domain-specific email.
- TXT (Text) Record: Stores arbitrary text data associated with the domain.
- NS (Name Server) Record: Specifies the authoritative name servers for the domain.
- SRV (Service) Record: Specifies the location of specific services for the domain.
- CAA (Certification Authority Authorization) Record: Specifies which certificate authorities are allowed to issue SSL certificates for the domain.
Adding A Records in Namecheap
An A record connects a domain name or subdomain to an IPv4 address. It allows your domain to be accessed through a specific IP address. Adding A records through Namecheap is a straightforward process. Here’s how:
1. Log in to your Namecheap account and select the “Domain List” tab.
2. Click on the domain name you want to modify.
3. Access the “Advanced DNS” tab or “DNS Records” section, depending on the Namecheap interface version you’re using.
4. Locate the “A Records” section and click on the “Add New Record” button.
| Host | Value |
| www | Your IPv4 address |
6. Save the changes, and your A record will be added to the DNS configuration for your domain.
Adding an A record allows you to associate a domain or subdomain with a specific IP address, ensuring that your website can be accessed using the desired address. It’s a simple yet essential step in managing your online presence.
Troubleshooting Common Issues with A Records
While adding A records in Namecheap is generally straightforward, you may encounter some common issues. Here are a few troubleshooting tips:
1. Incorrect IP Address: Double-check that the IP address you entered is correct. A typographical error can cause your website to point to a different server or not load at all.
2. Propagation Time: Keep in mind that DNS changes take some time to propagate across the internet. It may take a few hours or up to 48 hours for the changes to take effect globally.
3. Clear DNS Cache: If you’ve made changes to your DNS records but can’t see them reflected, try clearing your DNS cache. Cached records on your computer or local network may still be directing you to the old IP address.
By following these troubleshooting steps, you can ensure that your A records are correctly added and functioning as intended.
Setting Up MX Records in Namecheap
MX records are essential for directing domain-specific email to the correct email server. When you set up MX records in Namecheap, you ensure that email sent to your domain reaches the specified email server. Here’s how to set up MX records in Namecheap:
1. Log in to your Namecheap account and select the “Domain List” tab.
2. Click on the domain name you want to modify.
3. Access the “Advanced DNS” tab or “DNS Records” section.
4. Locate the “MX Records” section and click on the “Add New Record” button.
| Priority | Host | Value |
| 10 | @ (or leave it blank) | Your Mail Server |
6. Save the changes, and your MX record will be added to the DNS configuration for your domain.
By setting up MX records correctly, you ensure that your domain-specific email is received and processed by the appropriate email server, enhancing your email communication efficiency.
Troubleshooting Common Issues with MX Records
When configuring MX records in Namecheap, you may encounter some issues. Here are a few troubleshooting tips:
1. Incorrect Mail Server: Verify that the mail server address you entered is correct. An incorrect mail server address can result in email delivery failures.
2. Priority Order: Check the priority order of your MX records. Lower priority numbers indicate higher priority. Ensure the correct priority sequence to determine the order in which mail servers should be used.
3. Propagation Time: Remember that DNS changes can take time to propagate globally. Be patient and allow for the necessary propagation time.
By following these troubleshooting tips, you can resolve common MX record issues and ensure seamless email communication for your domain.
Creating CNAME Records in Namecheap
A CNAME record allows you to redirect a domain or subdomain to another domain name. It essentially serves as an alias for the specified domain or subdomain. Here’s how to create CNAME records in Namecheap:
1. Log in to your Namecheap account and select the “Domain List” tab.
2. Click on the domain name you want to modify.
3. Access the “Advanced DNS” tab or “DNS Records” section.
4. Locate the “CNAME Records” section and click on the “Add New Record” button.
| Host | Value | TTL (Time to Live) |
| www | Destination Domain Name | Automatic (or custom value) |
6. Save the changes, and your CNAME record will be added to the DNS configuration for your domain.
By creating CNAME records, you can conveniently redirect one domain or subdomain to another, ensuring a seamless browsing experience for your website visitors.
Configuring TXT Records in Namecheap
TXT records store arbitrary text data associated with your domain. They are commonly used for domain verification and other purposes like SPF (Sender Policy Framework) records. Here’s how to configure TXT records in Namecheap:
1. Log in to your Namecheap account and select the “Domain List” tab.
2. Click on the domain name you want to modify.
3. Access the “Advanced DNS” tab or “DNS Records” section.
4. Locate the “TXT Records” section and click on the “Add New Record” button.
| Host | Value | TTL (Time to Live) |
| @ (or other desired host) | Text Data | Automatic (or custom value) |
6. Save the changes, and your TXT record will be added to the DNS configuration for your domain.
Configuring TXT records in Namecheap allows you to provide important information associated with your domain, such as verifying ownership or implementing email authentication protocols like SPF and DKIM.
Understanding SPF Records
One common use of TXT records is for creating SPF (Sender Policy Framework) records. SPF records help prevent email spoofing and ensure that emails sent from your domain are verified and authenticated. To create an SPF record, you need to define the authorized mail servers for your domain. Here’s an example of the TXT record format for SPF:
v=spf1 mx include:_spf.google.com ~all
In the example above, v=spf1 defines the SPF version, mx includes the MX records of the domain in the authorized mail servers, and ~all specifies a soft fail result if the inbound email server is not in the authorized list but still allows the email to be delivered. SPF records help improve email deliverability and avoid having your legitimate emails marked as spam.
Configuring NS Records in Namecheap
NS records (Name Server records) specify the authoritative name servers for your domain. They indicate which servers handle DNS queries for your domain. Here’s how to configure NS records in Name
Key Takeaways: How to Add DNS Records in Namecheap?
- Adding DNS records in Namecheap is essential for managing your website’s domain.
- To add DNS records in Namecheap, log in to your account and navigate to the Domain List.
- Click on the “Manage” button next to the domain for which you want to add DNS records.
- Find the “Advanced DNS” section and click on “Add New Record” to create a new DNS record.
- Enter the necessary information, such as the record type, host, and address, and click “Save Changes” to add the DNS record.
Adding DNS records in Namecheap is a straightforward process that helps to connect your domain name with your website or email service. To add DNS records, log in to your Namecheap account and go to the Domain List page. Find the domain you want to manage and click on the ‘Manage’ button next to it.
Next, navigate to the ‘Advanced DNS’ tab and click on the ‘Add New Record’ button. Choose the type of record you want to add, such as A, CNAME, MX, or TXT, and fill in the required details. Once you’ve entered the information, save the changes and the DNS records will be added to your domain. It may take some time for the changes to propagate across the internet.