If you want to add a custom domain name to your Google Sites website, follow these simple steps:
This will associate your custom domain name with your Google Sites website, allowing you to have a professional online presence.
Adding a domain name to your Google Sites can give your website a professional touch and make it more memorable for your visitors. Did you know that a custom domain name not only enhances your online presence but also helps to establish credibility? It’s true! By following a few simple steps, you can easily add a domain name to your Google Sites and showcase your brand to the world.
Integrating your own domain with Google Sites is a straightforward process that brings numerous benefits. Google Sites allows you to create and customize websites effortlessly, and by adding your domain name, you can personalize your site even further. With your custom domain, you can reinforce your brand identity and ensure that your website is easily recognizable to your audience. Moreover, having a domain name associated with your Google Site helps improve search engine optimization (SEO) and increases the chances of your site appearing in relevant search results. By following the step-by-step instructions provided by Google, you can seamlessly integrate your domain name with your Google Site and enjoy the advantages it brings to your online presence.

Why Add a Custom Domain Name to Your Google Site?
Google Sites is a versatile platform for creating websites, whether for personal use or as part of a business or organization. While Google Sites provides users with a default site URL (e.g., yourname.sites.google.com), there are several reasons why you might want to add a custom domain name to your Google Site.
Firstly, a custom domain name adds a professional touch to your website. It allows you to have a unique web address that aligns with your brand or personal identity. Instead of a generic Google Sites URL, a custom domain name reflects your individuality or the image you want to project for your business or organization.
Secondly, a custom domain name can improve search engine optimization (SEO) for your website. When you have a keyword-rich domain name that is relevant to your content, it can help your site rank higher in search engine results. This means more visibility and potentially increased traffic to your site.
Lastly, having a custom domain name allows you to create branded email addresses. Instead of using a generic Gmail or Google Workspace email address, you can have an email address that matches your domain name (e.g., info@yourdomain.com). This adds a professional touch to your communication and enhances your brand’s credibility.
What You Need to Add a Custom Domain Name
Before delving into the steps of adding a custom domain name to your Google Site, there are a few things you’ll need:
- A registered domain name: You’ll need to purchase a domain name from a domain registrar. There are various domain registrars available, such as GoDaddy, Namecheap, and Google Domains. Choose a domain name that reflects your brand or website’s purpose.
- A Google Site: You should already have a Google Site created. If not, you can easily create one by signing in to your Google account and accessing Google Sites. Customize your site’s appearance and content before proceeding to add a custom domain name.
- Access to domain name settings: To add a custom domain name, you’ll need access to the domain name’s DNS (Domain Name System) settings. This is usually provided by your domain registrar. If you’re unsure how to access these settings, reach out to your domain registrar’s customer support for assistance.
Choosing the Right Domain Name
Before purchasing a domain name, it’s crucial to choose the right one that aligns with your goals and branding. Here are a few considerations:
- Relevance: Select a domain name that is relevant to your website’s content or purpose. This helps users understand what your site is about and improves SEO.
- Memorability: Choose a domain name that is easy to remember. Avoid using complex or lengthy words and consider using keywords that are familiar to your target audience.
- Brand Consistency: If you already have an established brand, it’s essential to maintain consistency. Use your brand name or a variation of it in the domain name to strengthen brand recognition.
- Availability: Check the availability of your desired domain name to ensure it hasn’t been registered by someone else. You can use domain registrar websites to search for available domain names.
- Extension: Decide on the domain name extension (e.g., .com, .org, .net) that best suits your website. Consider using popular extensions for broader reach.
Adding a Custom Domain Name to Your Google Site
Now that you understand the advantages of having a custom domain name and have the necessary prerequisites, here are the steps to add a custom domain name to your Google Site:
Step 1: Purchase a Domain
The first step is to purchase a domain name from a domain registrar. Follow these guidelines:
- Choose a reputable domain registrar: Select a trusted domain registrar that offers competitive pricing and reliable customer support.
- Search for available domain names: Enter your desired domain name in the search box provided by the domain registrar. Check for the availability of your chosen domain name. If it’s unavailable, consider using alternative variations or extensions.
- Complete the purchasing process: Follow the domain registrar’s instructions to complete the purchase. Provide the required information, such as your contact details, billing information, and any additional services you may need.
Step 2: Access Domain Name Settings
After purchasing the domain, you’ll need to access the domain name settings. The steps may vary depending on your domain registrar, but here is a general outline:
- Log in to your domain registrar account: Go to the domain registrar’s website and log in using your account credentials.
- Find the domain management section: Look for the domain management or domain settings section within your account.
- Locate DNS settings: Navigate to the DNS settings or DNS management page. This is where you will make the necessary changes to add the custom domain to your Google Site.
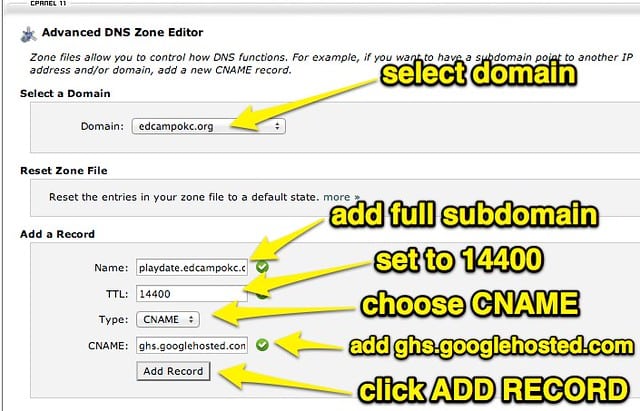
Step 3: Configure DNS Settings
Now that you have accessed the DNS settings, you’ll need to configure them to connect your custom domain to your Google Site. Here’s how:
Note: These instructions are based on using Google Domains as the domain registrar. If you’re using a different registrar, the steps may be slightly different, but the general concept remains the same.
- Locate the DNS records section: Look for a section where you can manage DNS records. It may be labeled as “DNS,” “DNS Management,” or “DNS Records.”
- Add a CNAME record: Create a new CNAME (Canonical Name) record. Enter “www” in the name or host field and set the value to “ghs.googlehosted.com.” This connects your domain to Google’s servers.
- Add a synthetic or URL redirect record: Some domain registrars require an additional step to redirect the root domain (without the “www”) to your Google Site. Create a new synthetic or URL redirect record with a blank or “@” name or host field. Set the destination or target to your Google Site URL (e.g., yoursite.sites.google.com).
- Save the changes: Once you’ve added the necessary DNS records, save the changes. It may take some time for the changes to propagate across the internet.
Step 4: Verify Domain Ownership
After configuring the DNS settings, you’ll need to verify domain ownership through Google Sites. Here’s what you need to do:
Note: It’s recommended to open the Google Sites editor in a separate tab or window to follow these steps while keeping this guide accessible.
- Open the Google Sites editor: Go to sites.google.com and click on the site you want to link to your custom domain. Click on the “Edit” button to open the editor.
- Go to site settings: In the top-right corner of the editor, click on the gear icon to access the site settings.
- Click on “Custom domains”: In the site settings panel, select the “Custom domains” tab.
- Click on “Connect a domain you already own”: Under the “Custom web address” section, click on the “Connect a domain you already own” link.
- Enter your domain name: In the text field, enter your custom domain name (e.g., www.yourdomain.com).
- Click “Verify”: Google Sites will attempt to verify domain ownership by checking the DNS records you configured. If verification is successful, you’ll be notified, and you can proceed to the next step.
Step 5: Set as Primary Domain
Once you’ve verified domain ownership, you can set your custom domain as the primary domain for your Google Site. Follow these steps:
- Select the custom domain: In the “Custom domains” tab, find your custom domain in the list of connected domains.
- Click “Set as primary”: Next to your custom domain, click on the “Set as primary” button. This ensures that your custom domain is the primary URL for your Google Site.
- Save the changes: Click “Save” to apply the changes to your site.
Step 6: Test and Configure Additional Settings
Once you’ve completed these steps, it’s important to test your custom domain to ensure it is correctly linked to your Google Site. Open a web browser and enter your custom domain in the address bar. If everything is set up correctly, your Google Site should load with your custom domain.
Additionally, you can configure additional settings for your custom domain, such as email forwarding, subdomains, SSL certificates, and more, depending on your domain registrar’s offerings.
Conclusion
Adding a custom domain name to your Google Site is a simple process that offers numerous benefits. It gives your website a professional look, improves SEO, and allows you to create branded email addresses. By following the steps outlined in this guide, you can seamlessly connect your domain to your Google Site and enhance your online presence.
Remember that the domain purchase and DNS configuration steps may vary slightly depending on your chosen domain registrar, but the general concept remains the same. If you encounter any difficulties, don’t hesitate to reach out to your domain registrar’s customer support for assistance.
Key Takeaways
- Adding a domain name to your Google Sites can help you create a professional online presence.
- To add a domain name, you need to purchase a domain from a domain registrar.
- After purchasing the domain, you need to configure the DNS settings to point to your Google Site.
- You can use HTML order snippets to add the necessary code to your Google Site.
- Follow the step-by-step instructions provided by Google to add your domain name to your Google Site successfully.
To add a domain name to your Google Sites website, follow these simple steps. Firstly, go to the Google Sites homepage and sign in with your Google account.
Next, click on the three-bar menu icon, followed by “Custom domain.” Enter the domain name you wish to use and click “Next.” Follow the instructions to verify ownership of the domain and set up the necessary DNS settings. Once verified, your domain name will be successfully added to your Google Sites website!