If you want to be your own web host, follow these steps:
- Research different web hosting options and choose the one that suits your needs.
- Purchase a domain name and hosting plan from a reliable provider.
- Set up your hosting account and configure your domain.
- Create and upload your website files using FTP or a website builder.
- Test your website to ensure it’s functioning correctly.
- Maintain and update your website regularly to provide a seamless experience for your visitors.
Are you tired of relying on third-party web hosting services? Take control of your online presence by becoming your own web host. It may seem daunting, but being your own web host offers numerous benefits and allows you to have complete control over your website. Instead of relying on a web hosting company, you can host your website on your own server, giving you the freedom to customize, secure, and maintain your website to fit your exact needs.
Being your own web host means you have complete control over your server environment. You can choose the hardware specifications, software configurations, and security measures that best suit your website. This level of control allows for faster loading speeds, improved website performance, and enhanced security. Additionally, being your own web host gives you the flexibility to scale your resources up or down as needed, ensuring your website can handle increasing traffic and evolving business requirements. By taking charge of your web hosting, you can create a reliable and efficient online presence that reflects your unique brand and meets the expectations of your visitors.

Understanding Web Hosting: A Step-by-Step Guide
In today’s digital age, having a website is crucial for businesses and individuals alike. Whether you’re starting an online store, showcasing your portfolio, or simply wanting to share your thoughts with the world, having your own web presence is essential. To establish a website, you need a web hosting provider. But did you know that you can be your own web host? In this article, we’ll explore the steps and considerations involved in being your own web host, giving you the knowledge and confidence to take control of your online presence.
Before diving into the nitty-gritty details of becoming your own web host, let’s first understand what web hosting is. In simple terms, web hosting is the process of storing your website’s files and making it accessible to others on the internet. When you visit a website, your browser sends a request to the web host’s server, which then retrieves the necessary files and displays them on your screen.
When you choose to be your own web host, you essentially become responsible for managing your own server infrastructure and ensuring your website is available to visitors. This level of control allows for greater customization, performance optimization, and the ability to scale your website as needed. However, it also requires technical expertise and a commitment to ongoing maintenance.
Setting Up Your Own Server
Now that you have a basic understanding of web hosting, let’s explore the process of setting up your own server. There are several approaches you can take, depending on your technical expertise and budget.
Option 1: Building Your Own Physical Server
One approach to becoming your own web host is to build your own physical server. This option requires purchasing the necessary hardware, such as a powerful computer, server-grade components, and reliable internet connectivity. You’ll also need to install a server operating system, such as Linux or Windows Server.
Building your own physical server gives you complete control over your web hosting environment. You can choose the hardware specifications, optimize performance, and easily scale as your website grows. However, it’s important to note that this approach requires technical expertise and can be costly, both in terms of upfront expenses and ongoing maintenance.
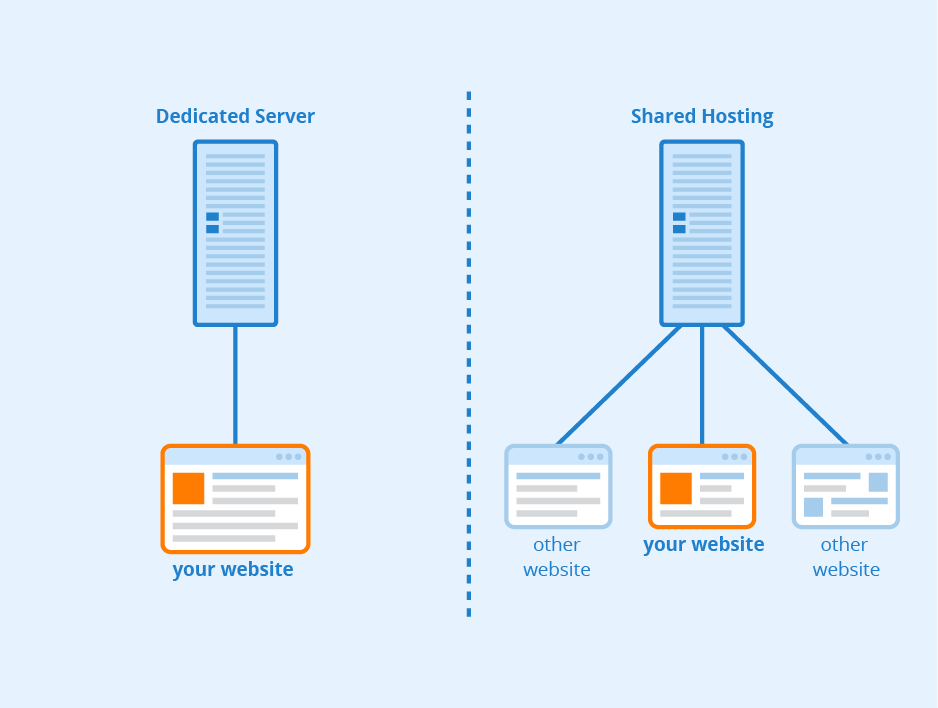
Option 2: Virtual Private Server (VPS) Hosting
If building your own physical server seems too daunting, another option is to use a Virtual Private Server (VPS). A VPS is a virtual machine that runs its own copy of an operating system, giving you more control and flexibility compared to shared hosting.
With VPS hosting, you’ll still need to handle server administration tasks, but the underlying infrastructure is managed by the hosting provider. This option strikes a balance between cost, control, and technical complexity. It’s an excellent choice for those who want more control over their hosting environment without the upfront expenses of building a physical server.
Configuring Your Server and Website
Once you have your server set up, the next step is to configure it and get your website up and running. Here are some key considerations:
Securing Your Server
One of the most critical aspects of being your own web host is ensuring the security of your server and website. Implementing robust security measures protects your website’s data, prevents unauthorized access, and builds trust with your visitors.
Here are some essential security practices to consider:
- Regularly update your server’s operating system and software to patch any vulnerabilities.
- Use strong, unique passwords for all accounts and enable two-factor authentication when available.
- Install a firewall to monitor incoming and outgoing traffic and block suspicious activity.
- Enable SSL/TLS encryption to secure data transmission between your server and visitors’ browsers.
- Regularly backup your website’s files and database in case of data loss or system failures.
Installing and Configuring Web Server Software
To make your website accessible on the internet, you’ll need to install and configure web server software. The two most popular options are:
1. Apache HTTP Server
Apache is a widely used open-source web server software known for its stability and flexibility. It supports various operating systems and is highly customizable, making it an excellent choice for hosting websites of all sizes.
2. Nginx
Nginx is a lightweight, high-performance web server software that excels in handling concurrent connections. It’s known for its efficiency and ability to handle large amounts of web traffic, making it ideal for high-traffic websites or applications.
After installing your chosen web server software, you’ll need to configure it to host your website. This involves creating virtual hosts, defining domain names, and specifying the directory where your website’s files will be stored.
Managing Your Web Hosting Environment
Being your own web host means taking on the responsibilities of managing your web hosting environment. Here are some key areas to focus on:
Website Performance Optimization
Ensuring your website performs optimally is essential for providing a positive user experience and improving search engine rankings. Here are some performance optimization techniques:
- Optimize your website’s code and assets (CSS, JavaScript, images) to reduce file sizes and improve load times.
- Cache static content to reduce server load and improve response times.
- Implement a Content Delivery Network (CDN) to distribute your website’s content across multiple servers geographically, improving load times for visitors around the world.
Monitoring Your Server and Website
Regularly monitoring your server and website allows you to identify and address any performance issues or security threats proactively. Here are some monitoring practices:
- Set up server monitoring tools to track metrics like CPU usage, memory usage, and disk space.
- Implement website uptime monitoring to receive alerts if your website goes down.
- Use security scanning tools to regularly check for vulnerabilities and malware.
- Analyze website analytics to gain insights into visitor behavior and make data-driven improvements.
Scalability and Resource Management
As your website grows, you may need to scale your resources to handle increased traffic and demand. Here are some considerations for scalability and resource management:
Regularly monitor your website’s traffic and server performance to identify when additional resources are needed. This could involve upgrading your server hardware, increasing bandwidth, or moving to a larger hosting plan.
Optimize your website’s code and database queries to ensure efficient use of server resources and faster load times.
Conclusion
Becoming your own web host may seem like a daunting task, but with the right knowledge and resources, it can be an empowering and rewarding experience. By taking control of your web hosting environment, you have the flexibility to customize your server, optimize performance, and scale your website as needed. However, it’s important to remember that being your own web host requires technical expertise, ongoing maintenance, and a commitment to security.
Key Takeaways: How to Be Your Own Web Host?
1. Choose a reliable web hosting provider.
2. Purchase a domain name for your website.
3. Set up your website using a content management system like WordPress.
4. Configure your domain’s DNS settings to point to your web hosting provider.
5. Regularly monitor and maintain your website to ensure its security and performance.
Being your own web host allows you to have full control over your website and its performance. You can save money by hosting your site on your own server and have the flexibility to customize it according to your needs.
To be your own web host, you need to set up a server, install the necessary software, and configure it to serve your website. You can choose between setting up a physical server or using a virtual server provider. Once your server is set up, you’ll need to secure it, optimize its performance, and regularly maintain it to ensure smooth operation.
Additionally, you’ll need to register a domain name and point it to your server’s IP address. This ensures that visitors can find your website by typing in your domain name.
By being your own web host, you have complete control over your website’s security, speed, and reliability. It requires technical knowledge and ongoing maintenance, but it gives you the freedom to manage your website as you see fit.