Changing nameservers in Hostgator can be an important step in managing your website’s domain and ensuring it functions correctly. Did you know that by changing the nameservers, you can easily point your domain to a different hosting provider or update your DNS settings? This process is relatively simple and can be done within a few minutes, allowing you to have better control over your website’s performance.
To change nameservers in Hostgator, you need to log in to your Hostgator cPanel and locate the ‘Domains’ section. From there, you can select ‘Simple DNS Zone Editor’ or ‘Advanced DNS Zone Editor’ depending on your preference and expertise. Once you access the DNS Editor, you can enter the new nameserver information and save the changes. This action will initiate a propagation period, which usually takes a few hours to complete, during which the new nameservers will be applied to your domain across the internet. It’s important to note that during this propagation period, your website may experience temporary downtime.
To change nameservers in Hostgator, follow these steps: Step 1: Log in to your HostGator cPanel. Step 2: Scroll down to the “Domains” section and click on “Zone Editor.” Step 3: Find the domain you want to change nameservers for and click on “Manage.” Step 4: Under the “NS (NameServer)” section, click on “Edit.” Step 5: Enter the new nameservers and click on “Save.” Your nameservers will be changed.
Understanding Nameservers in HostGator
When it comes to managing a website, understanding how to change nameservers is an essential skill. Nameservers are a crucial component of your website’s DNS (Domain Name System), responsible for translating domain names into IP addresses. If you’re a HostGator user, you’ll need to know how to change nameservers within the platform to ensure your website is correctly connected to your domain and functioning properly.
To start the process of changing nameservers in HostGator, you’ll need to log in to your cPanel, the control panel for managing your hosting account. Once you’re logged in, you can navigate to the “Domains” section and locate the “Advanced DNS Zone Editor” tool. This tool allows you to make changes to the DNS records associated with your domain, including the nameservers.
Before making any changes, it’s important to understand the consequences of changing nameservers. When you modify the nameservers, the DNS records for your domain will be updated, which means your website, email, and other services associated with the domain may be affected. Therefore, it’s essential to have a clear understanding of why you’re changing nameservers and how it will impact your website.
If you’re using HostGator for your website hosting and you need to change your nameservers for any reason, follow the steps outlined below:
- Step 1: Log in to your HostGator cPanel
- Step 2: Navigate to the “Domains” section
- Step 3: Locate the “Advanced DNS Zone Editor” tool
- Step 4: Find the domain for which you want to change the nameservers
- Step 5: Click on the “Edit” button next to the domain
- Step 6: Update the nameserver records with the new nameservers
- Step 7: Save the changes
Once you’ve completed these steps, your nameserver changes should take effect within 24-48 hours, although in some cases, it may propagate more quickly.
Changing Nameservers for a Domain in HostGator
Now that we understand the basics of nameservers in HostGator, let’s explore the process of changing nameservers for a specific domain within the platform.
Step 1: Accessing the Domain Settings
The first step is to log in to your HostGator cPanel using your credentials. Once you’re logged in, navigate to the “Domains” section, where you’ll find various tools and options for managing your domains.
Within the “Domains” section, look for the “Advanced DNS Zone Editor” tool. This tool allows you to modify the DNS records for your domains, including the nameservers.
Click on the “Advanced DNS Zone Editor” to proceed to the next step.
Step 2: Select the Domain
After accessing the “Advanced DNS Zone Editor,” you’ll see a list of your domains. Locate the domain for which you want to change the nameservers and click on the “Edit” button next to it. This will allow you to make changes to the DNS records associated with that particular domain.
It’s important to double-check that you’re selecting the correct domain to avoid any unintended changes to your other domains.
Once you’ve clicked on the “Edit” button, you’ll be taken to the DNS management page for that domain.
Step 3: Update Nameserver Records
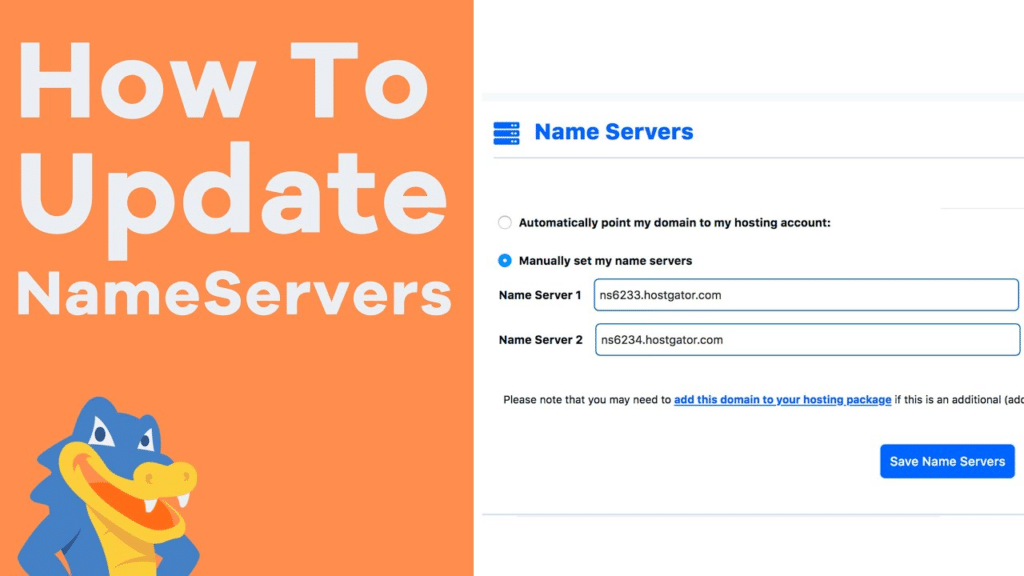
Now that you’re on the DNS management page for your chosen domain, it’s time to update the nameserver records. You’ll typically see two nameserver fields: “Nameserver 1” and “Nameserver 2.”
Enter the new nameservers provided by your new hosting provider or the DNS service you’re switching to in these fields. Make sure to enter the nameservers exactly as provided to you.
If you’re unsure about the correct nameservers to use, it’s recommended to contact your new hosting provider or DNS service for assistance.
Step 4: Save Changes
Once you’ve updated the nameserver records, click on the “Save” or “Save Changes” button to apply the changes. HostGator will then update the DNS records for your domain with the new nameservers.
It’s important to note that changes to DNS records may take some time to propagate throughout the internet. This process can take anywhere from 24-48 hours, although in some cases, it may happen more quickly.
Common Issues and Troubleshooting
Nameserver Propagation
As mentioned earlier, changes to nameservers may take some time to propagate throughout the internet. During this propagation period, some users may still be directed to the old nameservers, while others will be directed to the new ones. This can result in temporary inconsistencies in website accessibility and email delivery.
If you’ve recently changed nameservers for your domain and are experiencing issues, it’s advisable to wait for the propagation to complete before taking any further action. If the issues persist after 48 hours, it’s recommended to reach out to your hosting provider or DNS service for assistance.
Incorrect Nameserver Records
When updating nameservers, it’s crucial to enter the correct information. Misspelling or using the wrong nameserver addresses can result in your website and other services associated with the domain not functioning correctly.
If you realize that you’ve entered incorrect nameserver records, follow the same steps outlined earlier to access the DNS management page for your domain and update the records with the correct information. Remember to save the changes and allow time for propagation.
DNS Cache
In some cases, your computer or local network may have DNS cache that needs to be cleared. DNS cache is a local database that stores the IP addresses of websites you’ve recently visited, allowing for faster access to those sites. However, if the nameserver change hasn’t propagated locally yet, clearing the DNS cache can help your computer retrieve the updated records.
To clear the DNS cache on your computer, follow the instructions specific to your operating system. After clearing the cache, restart your browser and try accessing your website again.
In Conclusion
Changing nameservers in HostGator is a straightforward process that can be done through the cPanel’s “Advanced DNS Zone Editor” tool. Remember to have a clear understanding of why you’re making the change and the potential impact on your website and other associated services.
If you encounter any issues along the way, remember to reach out to HostGator support or your new hosting provider for assistance. They will be able to guide you through the process and troubleshoot any problems that may arise.
Now that you have a better understanding of how to change nameservers in HostGator, you can confidently make the necessary adjustments to connect your website to the appropriate domain and ensure its smooth functioning.
Key Takeaways: How to Change Nameservers in Hostgator?
- Nameservers are like the address books of the internet that tell your domain name where to find your website.
- To change nameservers in Hostgator, log in to your Hostgator account and navigate to the “Domains” section.
- Find the domain you want to change nameservers for and click on “Manage Domains”.
- In the “Manage Domains” page, click on the “Name Servers” tab and enter the new nameservers provided by your web host.
- Save your changes and allow some time for the changes to propagate across the internet.
To change nameservers in Hostgator, follow these steps:
1. Log in to your Hostgator account and go to the control panel.
2. Locate the “Domains” section and click on “Manage Domains”.
3. Find the domain you want to update and click on “Manage”.
4. Scroll down to the “Nameservers” section and click on “Change”.
5. Choose the option to “Use custom nameservers”.
6. Enter the new nameservers provided by your new hosting provider.
7. Click on “Save Nameserver Settings” to update the nameservers.
That’s it! Your nameservers have been changed in Hostgator.
If you have any questions or need further assistance, contact Hostgator support.