Connecting Filezilla to HostGator is a simple process that allows easy file transfer between your computer and your hosting account. Start by downloading and installing Filezilla. Then, open Filezilla and go to “File” > “Site Manager.” Click on “New Site” and enter a name for your connection. In the “Host” field, type in your HostGator server IP address. Choose “FTP – File Transfer Protocol” as the protocol and enter your HostGator FTP username and password. Click on “Connect” to establish the connection between Filezilla and HostGator.
Connecting Filezilla to Hostgator is a simple yet vital step in managing your website. By seamlessly linking these two platforms, you gain control over your website’s files and can effortlessly transfer data between your local machine and the server. Whether you’re a seasoned web developer or just starting your online journey, understanding how to connect Filezilla to Hostgator is essential for efficient website management.
Filezilla is a popular FTP (File Transfer Protocol) client that allows you to transfer files between your computer and a remote server like Hostgator. With the ability to handle large file transfers and provide a secure connection, Filezilla offers a reliable solution for website owners. By configuring Filezilla with your Hostgator credentials, you can easily access your website’s files, make updates, and ensure seamless functionality. Connecting Filezilla to Hostgator is a straightforward process that empowers you to manage your website efficiently.
How to Connect Filezilla to Hostgator?
When it comes to managing your website files, Filezilla is a popular choice among web developers and administrators. HostGator, on the other hand, is a widely-used web hosting service. So, if you have a website hosted on HostGator and want to connect it to Filezilla for file management, you’re in the right place.
Connecting Filezilla to HostGator is a straightforward process that involves a few simple steps. By following these instructions, you’ll be able to access and manage your website files easily. Here, we’ll guide you through the process, ensuring that you have a seamless experience connecting Filezilla to HostGator.
Before we dive into the steps, it’s essential to understand the benefits of using Filezilla and HostGator together. Filezilla is a free, open-source FTP client that allows you to transfer files between your computer and a remote server. It offers a user-friendly interface and supports various operating systems.
HostGator, on the other hand, is a reliable web hosting service that provides excellent performance, uptime, and customer support. By connecting Filezilla to HostGator, you can upload, download, and manage your website files quickly and efficiently.
Now, let’s jump into the steps to connect Filezilla to HostGator:
Step 1: Download and Install Filezilla
The first step in connecting Filezilla to HostGator is to download and install Filezilla on your computer. Filezilla is available for Windows, macOS, and Linux, so make sure to choose the appropriate version for your operating system.
To download Filezilla, follow these steps:
- Go to the Filezilla website.
- Navigate to the “Download Filezilla Client” section.
- Click on the download link for your operating system.
- Once the download is complete, run the installer and follow the on-screen instructions to install Filezilla on your computer.
Once Filezilla is successfully installed, you can proceed to the next step.
Step 2: Obtain HostGator FTP Credentials
In order to connect Filezilla to HostGator, you’ll need to obtain your FTP credentials from HostGator. These credentials include the FTP server address, username, and password. You can find this information in the HostGator control panel.
Here’s how you can obtain your HostGator FTP credentials:
- Log in to your HostGator account.
- Navigate to the control panel or cPanel.
- Look for the “FTP Accounts” or “FTP Manager” option.
- Under the “FTP Accounts” section, you’ll find your FTP server address, username, and the option to set a password. If you haven’t created an FTP account yet, you can do so by clicking on the “Add FTP Account” button.
- Make a note of your FTP credentials as you’ll need them in the next step.
Step 3: Configure Filezilla
Now that you have Filezilla installed and your HostGator FTP credentials, it’s time to configure Filezilla to connect to your HostGator account. Follow these steps:
- Open Filezilla on your computer.
- In the “File” menu, click on “Site Manager.”
- Click on the “New Site” button to add a new site.
- Enter a name for the site (e.g., “My HostGator Site”).
- Under the “Host” field, enter the FTP server address provided by HostGator.
- Choose “FTP – File Transfer Protocol” as the protocol.
- Set the encryption to “Use explicit FTP over TLS if available.”
- Choose “Use Normal login” as the logon type.
- Enter your HostGator FTP username and password in the respective fields.
- Click on the “Connect” button to establish a connection to your HostGator account.
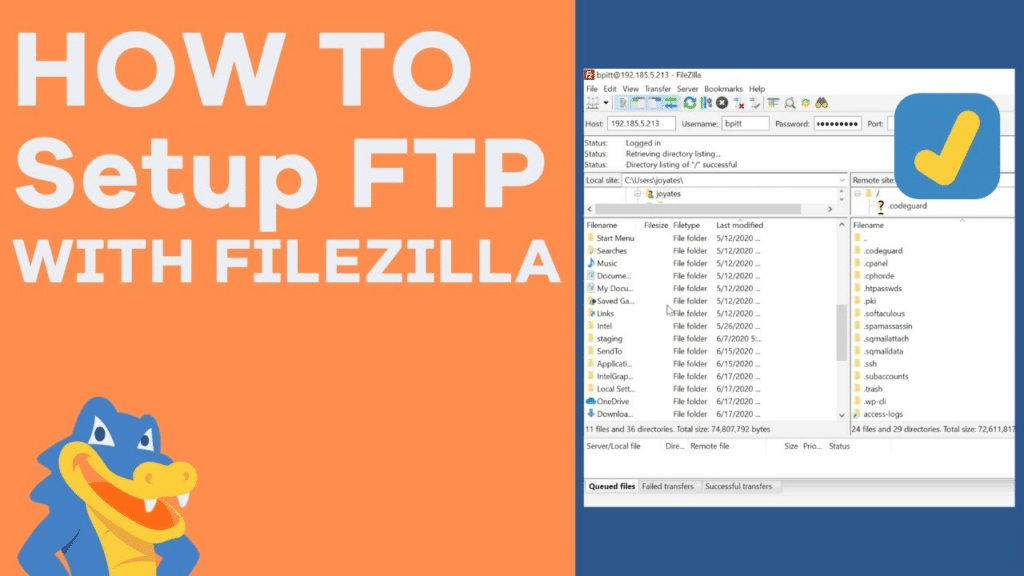
If the connection is successful, you’ll see the directory listing of your HostGator account on the Remote Site pane in Filezilla. You can now begin managing your website files using Filezilla.
Step 4: Upload, Download, and Manage Files
With Filezilla connected to HostGator, you have various options for managing your website files. Here are some common tasks you can perform:
- Upload Files: To upload files to your HostGator account, simply drag and drop them from your local computer to the desired location on the Remote Site pane in Filezilla.
- Download Files: To download files from your HostGator account to your local computer, drag and drop them from the Remote Site pane to a local directory in Filezilla.
- Edit Files: Double-click on a file in the Remote Site pane to download it and open it in your default text editor. Make any necessary changes, save the file, and then upload it back to the appropriate location in Filezilla.
- Create Directories: Right-click on any directory in the Remote Site pane and choose “Create directory” to create a new directory in your HostGator account.
- Delete Files and Directories: Right-click on a file or directory in the Remote Site pane and choose “Delete” to remove it from your HostGator account.
By using these file management features in Filezilla, you can easily keep your website files organized and up to date.
Conclusion
Connecting Filezilla to HostGator allows you to efficiently manage your website files. By following the steps outlined in this article, you can establish a connection between Filezilla and HostGator, enabling you to upload, download, edit, and organize your website files with ease.
Filezilla’s user-friendly interface and HostGator’s reliable hosting service make this combination a powerful tool for website administrators and developers. Start using Filezilla with HostGator today and take control of your website’s file management.
For more information about connecting Filezilla to HostGator and other website management tips, visit the HostGator Knowledge Base.
Key Takeaways: How to Connect Filezilla to Hostgator?
- Download and Install Filezilla on your computer.
- Retrieve your FTP login credentials from Hostgator.
- Open Filezilla and go to “File” > “Site Manager.”
- Add a new site and enter your FTP login details.
- Click “Connect” to establish a connection between Filezilla and Hostgator.
Connecting FileZilla to HostGator is a simple process that allows you to transfer files between your computer and your web hosting account. First, download and install FileZilla, then open the program and go to File → Site Manager. In the Site Manager, click on “New Site” and give it a name.
Next, enter your HostGator FTP login details including your host (typically ftp.yourdomain.com), username, and password. Set the port to 21 and choose “FTP – File Transfer Protocol” as the protocol. Click “Connect” and FileZilla will connect to your HostGator account. You can now transfer files by dragging and dropping them between your computer and the remote server.