To connect WordPress to Bluehost, follow these steps:
- Create a Bluehost account and login.
- In your Bluehost dashboard, locate the “Website” section, and click on “Install WordPress.”
- Select the domain you want to install WordPress on.
- Choose your desired settings and click “Install.”
- Once the installation is complete, you will receive an email with your WordPress login credentials.
Are you a website owner looking to connect your WordPress site to Bluehost? Look no further! Connecting WordPress to Bluehost is a straightforward process that can enhance your website’s performance and reliability. By hosting your WordPress site on Bluehost, you’ll have access to essential features and tools to optimize your website and provide a seamless user experience. So, let’s dive into the simple steps to connect WordPress to Bluehost and take your website to new heights!
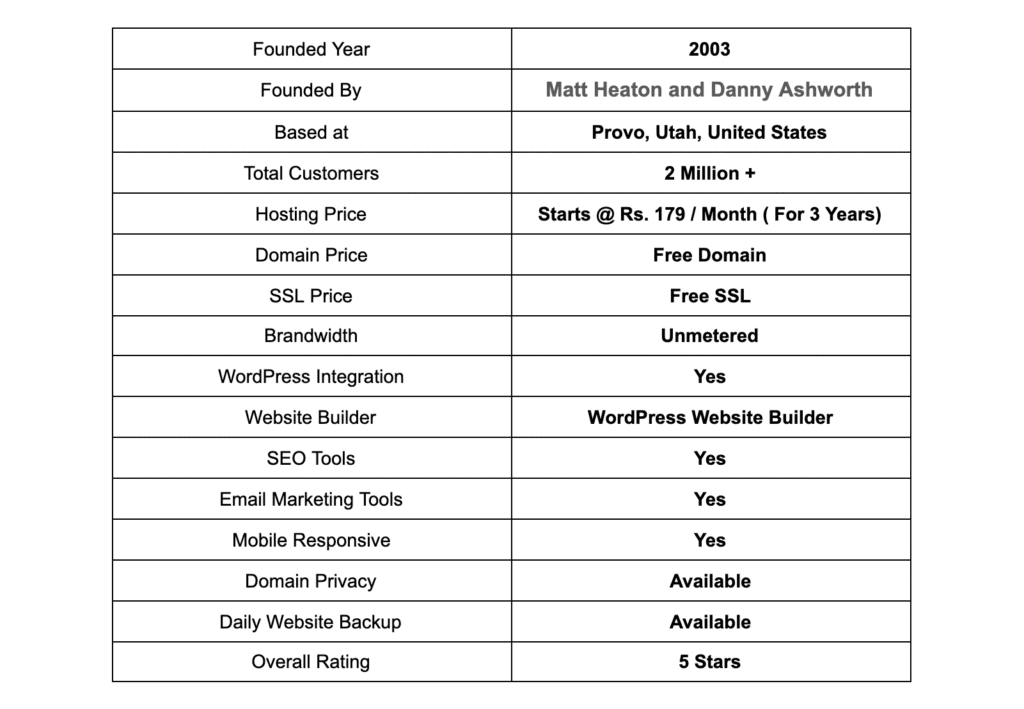
Connecting WordPress to Bluehost offers a wealth of benefits for your website. Bluehost, established in 2003, is one of the leading web hosting providers and is officially recommended by WordPress. With over 2 million websites hosted on Bluehost, it’s a trusted platform that ensures your site’s speed, security, and stability. By integrating WordPress with Bluehost, you’ll have access to one-click installation of WordPress, automatic backups, unlimited storage, and a user-friendly interface to manage your website effectively. This powerful combination empowers website owners to create a dynamic online presence without any technical expertise. So, let’s explore the steps to connect WordPress to Bluehost and unleash the full potential of your website!

How to Connect WordPress to Bluehost?
Connecting WordPress to Bluehost is a straightforward process that enables you to host your WordPress website on Bluehost’s powerful servers. Bluehost is one of the most popular web hosting providers and offers excellent features and reliability for WordPress sites. By connecting WordPress to Bluehost, you can take advantage of their optimized WordPress hosting environment, which enhances the performance and security of your website.
To connect WordPress to Bluehost, you’ll need to follow a few simple steps:
- Create a Bluehost account
- Install WordPress on Bluehost
- Connect your domain name to Bluehost
- Configure the primary domain
Let’s delve into each step in more detail.
Creating a Bluehost account is the first step in connecting WordPress to Bluehost. Bluehost offers various hosting plans to choose from, depending on your website’s needs and the level of control you require. Simply visit Bluehost’s website and select your desired hosting plan. Follow the prompts to create your account, select your domain name, and complete the registration process.
Once you have registered and created your Bluehost account, the next step is to install WordPress on your Bluehost hosting. Bluehost provides a one-click WordPress installation feature, making it incredibly simple and convenient to set up your WordPress website. Log in to your Bluehost account, navigate to the control panel, and locate the WordPress installation option. Follow the on-screen instructions to complete the installation process.
After installing WordPress on Bluehost, it’s time to connect your domain name to your Bluehost hosting. If you have purchased your domain name from Bluehost, it will automatically be connected to your hosting account. However, if you have a domain name from a different registrar, you’ll need to update the domain’s nameservers to point to Bluehost’s nameservers. This process may vary depending on your domain registrar, so it’s best to refer to their documentation or contact their support for guidance.
Once you have connected your domain to Bluehost, you’ll need to configure the primary domain for your WordPress site. In the Bluehost control panel, locate the “Domains” section and select “Assign” next to your primary domain. Choose the directory in which you want to install WordPress and complete the configuration process. This step ensures that when visitors access your domain, they are directed to your WordPress site on Bluehost.
Configuring WordPress Settings on Bluehost
After connecting WordPress to Bluehost, it’s essential to configure some settings within WordPress to optimize your website’s performance and security. Here are a few key settings you should consider:
1. Permalinks
Permalinks are the permanent URLs to your individual WordPress posts, pages, and other content. By default, WordPress uses a permalink structure that includes the post ID. However, this structure is not SEO-friendly and may negatively impact your search engine rankings. To improve your permalinks, log in to your WordPress dashboard, navigate to “Settings,” and select “Permalinks.” Choose a structure that includes the post name and save the settings.
Benefits of SEO-friendly Permalinks
Using SEO-friendly permalinks can help improve your website’s search engine optimization. When your URLs contain relevant keywords from your post or page titles, it becomes easier for search engines to understand the topic and context of your content. This can potentially lead to higher rankings and increased organic traffic from search engines.
Example of SEO-friendly Permalinks
An example of an SEO-friendly permalink structure is “/%postname%/”, which displays the post or page title in the URL. For example, if you have a blog post titled “Top 10 Tips for WordPress SEO,” the permalink would be “https://example.com/top-10-tips-for-wordpress-seo/.” This structure provides a clear indication of the post’s topic and can improve the user experience and search engine visibility.
2. WordPress Theme and Plugins
Choosing a suitable WordPress theme and using relevant plugins are crucial for optimizing your website’s functionality and appearance. When selecting a theme on WordPress, consider factors such as responsiveness, speed, and customization options. Look for themes that are well-coded, regularly updated, and have positive user reviews.
Essential Plugins for WordPress
Plugins are like add-ons that extend the core functionality of WordPress. Here are some essential plugins that can enhance the performance and security of your WordPress site:
- Yoast SEO: Helps optimize your website for search engines
- W3 Total Cache: Improves website speed and performance
- Wordfence Security: Provides protection against hacking attempts
- Jetpack: Offers a suite of powerful features for WordPress websites
3. Security Measures
Securing your WordPress site is crucial to protect it from hacking attempts and unauthorized access. Bluehost provides solid security measures, but there are additional steps you can take:
Use Strong Passwords
Ensure that you use strong, unique passwords for your WordPress admin account and any other user accounts with administrative access. Avoid common passwords and consider using a password manager to generate and store complex passwords securely.
Enable Two-Factor Authentication (2FA)
Enable two-factor authentication for your WordPress accounts whenever possible. This adds an extra layer of security by requiring a second form of verification, such as a code sent to your mobile device, in addition to your password.
Regularly Update WordPress and Plugins
Keep your WordPress core and plugins up to date by regularly installing the latest updates. Updates often include security patches that address vulnerabilities, so staying current helps protect your site from potential threats.
Backup Your Website Regularly
Regularly backing up your WordPress website is essential in case of data loss or other emergencies. Bluehost provides backup tools, but you can also use plugins like UpdraftPlus or Jetpack to automate this process and store backups offsite for added security.
Conclusion
Connecting WordPress to Bluehost is a simple yet essential process for hosting your WordPress website on a reliable and powerful platform. By following the steps mentioned above and optimizing your WordPress settings, you can ensure excellent performance, security, and SEO for your website.
Remember to regularly update your WordPress core, themes, and plugins to benefit from the latest features and security patches. Additionally, make use of security measures like strong passwords, two-factor authentication, and regular backups to safeguard your website from potential threats.
By connecting WordPress to Bluehost and implementing best practices, you can create a successful and secure website that delivers an exceptional user experience.
Use Bluehost for Reliable WordPress Hosting
If you’re looking for a reliable web hosting provider for your WordPress website, Bluehost is an excellent choice. With its optimized WordPress hosting environment, top-notch security features, and exceptional customer support, Bluehost is trusted by millions of website owners worldwide.
Sign up for Bluehost today and take advantage of their powerful hosting platform for your WordPress site.
Key Takeaways: How to Connect WordPress to Bluehost?
- Bluehost is a popular web hosting provider that is compatible with WordPress.
- To connect WordPress to Bluehost, you can use the “One-Click WordPress Installation” feature offered by Bluehost.
- After installing WordPress, you can access your WordPress dashboard through the Bluehost control panel.
- You can customize your WordPress website by choosing and installing themes and plugins.
- Bluehost provides excellent customer support to assist you with any WordPress-related issues or questions.
You can easily connect WordPress to Bluehost by following these simple steps:
- Sign up for a Bluehost account and select a hosting plan.
- Once your account is set up, log in to your Bluehost control panel.
- Look for the WordPress icon and click on it to start the installation process.
- Follow the on-screen instructions to choose a domain for your WordPress site and complete the installation.
- After the installation is complete, you can access your WordPress dashboard by entering your domain followed by “/wp-admin” in your browser’s address bar.
Now you’re ready to start customizing and creating your website using WordPress on Bluehost!