How to Host WordPress Website on Bluehost:
- Sign up for a Bluehost account and choose a hosting plan.
- Log in to your Bluehost account and go to the control panel.
- Click on the “WordPress” icon and select the website domain.
- Enter your website details and click “Install WordPress.”
- Once installed, you can start customizing your WordPress website on Bluehost.
Are you looking to host your WordPress website on Bluehost? Look no further, as Bluehost is one of the most reliable and popular web hosting providers specifically optimized for WordPress. With its user-friendly interface and excellent customer support, Bluehost makes it easy to get your website up and running smoothly. So, let’s dive into the steps to host your WordPress website on Bluehost.
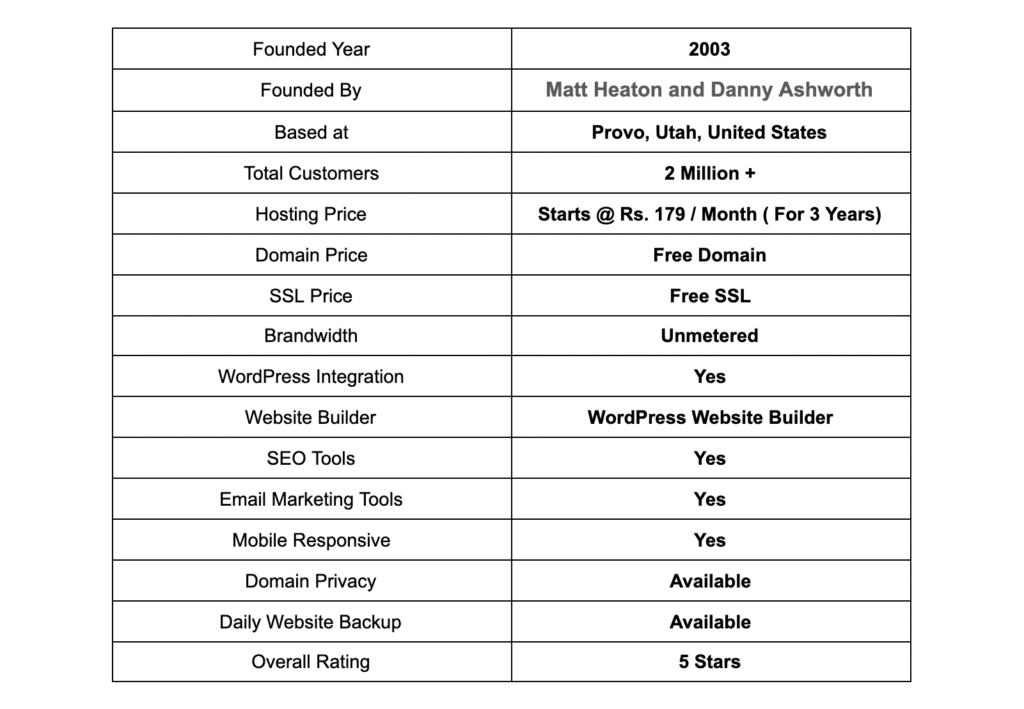
Bluehost has a long-standing history of providing top-notch hosting services, and it has been recommended by WordPress.org since 2005. With over two million websites hosted and a customer base of millions of satisfied users, Bluehost has proven its reliability and performance. Furthermore, Bluehost boasts an impressive 99.9% uptime guarantee, ensuring that your website remains accessible to your visitors at all times. By choosing Bluehost, you’re not only getting a trusted hosting provider, but you’re also benefiting from their commitment to delivering exceptional service and support.

Getting Started with Bluehost
Bluehost is a popular web hosting provider that offers a range of services to help individuals and businesses get their websites up and running. If you’re planning to host a WordPress website, Bluehost is a great option as they provide specialized WordPress hosting plans that are optimized for performance and security.
To get started with Bluehost, you’ll first need to sign up for an account. Visit the Bluehost website and click on the “Get Started” button to begin the registration process. You’ll be asked to choose a plan that suits your needs, ranging from basic shared hosting to more advanced options like VPS or dedicated servers. Once you’ve selected a plan, you’ll need to choose a domain name for your website. If you already have a domain, you can enter it in the “Use a domain you own” field. Otherwise, you can register a new domain directly with Bluehost.
After choosing your plan and domain, you’ll be prompted to enter your personal information and payment details. Bluehost offers various payment options, including credit cards and PayPal. Once your payment is processed, you’ll receive a confirmation email with instructions on how to access your Bluehost account.
Installing WordPress on Bluehost
Now that you have your Bluehost account set up, it’s time to install WordPress. Bluehost makes the installation process quick and easy with their one-click WordPress install feature.
To install WordPress, log in to your Bluehost account and navigate to the control panel. Look for the “Website” section and click on the “Install WordPress” button. You’ll be guided through a series of steps to set up your WordPress installation.
First, you’ll need to select the domain where you want to install WordPress. If you have multiple domains associated with your Bluehost account, choose the appropriate one from the drop-down menu. Next, you’ll be asked to enter a title and description for your website. These can be changed later from the WordPress dashboard.
After entering the necessary information, click on the “Install Now” button to start the installation process. Bluehost will automatically create a database for your WordPress installation and set up the necessary files. Once the installation is complete, you’ll receive a confirmation message with your WordPress login credentials.
Customizing Your WordPress Website
Now that you have WordPress installed on Bluehost, it’s time to customize your website and make it your own. Here are a few key steps to get started:
Choosing a Theme
WordPress offers a wide range of free and premium themes that you can use to change the appearance of your website. To choose a theme, log in to your WordPress dashboard and navigate to “Appearance” > “Themes.” Browse through the available options, preview them, and install the one you like. Remember to customize the theme settings to match your branding and personal preferences.
Installing Plugins
Plugins are a powerful way to extend the functionality of your WordPress website. They can add features like contact forms, SEO optimization, social media integration, and more. To install plugins, go to the WordPress dashboard and click on “Plugins” > “Add New.” Search for the desired plugin, install it, and activate it. Be mindful of the number of plugins you install, as too many can slow down your website.
Creating Pages and Posts
With WordPress, you can easily create and publish content on your website. Pages are static and are typically used for permanent information like an about page or contact page. To create a page, go to the WordPress dashboard and click on “Pages” > “Add New.” Give your page a title, add your content, and hit the “Publish” button.
Posts, on the other hand, are used for blog entries or time-sensitive content. To create a post, click on “Posts” > “Add New” and follow the same process as creating a page. You can categorize and tag your posts to organize them effectively.
Securing Your WordPress Website on Bluehost
Security is crucial when hosting a WordPress website. Here are some essential steps to protect your website on Bluehost:
Keep WordPress and Plugins Updated
WordPress regularly releases updates to improve security and fix bugs. It’s important to keep your WordPress installation and plugins up to date to minimize the risk of vulnerabilities. Check for updates regularly in the WordPress dashboard and apply them as soon as they become available.
Use a Strong Admin Password
Creating a strong password for your WordPress admin account is essential to prevent unauthorized access. Use a combination of uppercase and lowercase letters, numbers, and special characters. Avoid using common words or easily guessable passwords.
Install a Security Plugin
There are several security plugins available for WordPress that can enhance the security of your website. Plugins like Wordfence or Sucuri can help detect and block potential threats, provide firewall protection, and monitor your website for suspicious activity. Install and configure a security plugin to add an extra layer of security to your WordPress installation.
Optimizing Your WordPress Website on Bluehost
To ensure your WordPress website performs well and loads quickly for your visitors, it’s important to optimize it. Here are a few tips:
Optimize Images
Large image files can slow down your website’s loading time. Before uploading images to your WordPress media library, optimize them for the web by reducing their file size without compromising quality. You can use image optimization tools like TinyPNG or WP Smush to automatically compress your images.
Use Caching
Caching can significantly improve the performance of your WordPress website. By caching your site’s static content, you reduce the load on your server and decrease page load times. Bluehost offers caching solutions like Varnish and the WordPress-specific plugin, WP Super Cache. Activate caching to speed up your website.
Minify CSS and JavaScript
Minifying your CSS and JavaScript files can help reduce their size, resulting in faster page load times. There are various plugins available for WordPress, such as Autoptimize and W3 Total Cache, that can automatically minify these files for you.
Conclusion
Hosting a WordPress website on Bluehost is a straightforward process that allows you to create a powerful and customizable online presence. By following the steps outlined in this article, you can get your WordPress website up and running on Bluehost quickly and efficiently.
Remember to customize your website, install essential plugins, and take the necessary security and optimization measures to ensure your website performs well and stays secure. With Bluehost’s reliable hosting services and WordPress’s versatile platform, you’ll have all the tools you need to create an exceptional website.
Key Takeaways: How to Host WordPress Website on Bluehost?
- Bluehost is a popular web hosting provider that offers easy WordPress installation.
- To host a WordPress website on Bluehost, sign up for a hosting plan and choose a domain name.
- After signing up, log in to your Bluehost account and navigate to the WordPress installer.
- Follow the prompts to set up your WordPress site, including choosing a theme and customizing settings.
- Once your site is set up, you can start building and designing your WordPress website on Bluehost.
To host a WordPress website on Bluehost, follow these simple steps. First, sign up for a Bluehost account.
Next, choose a domain name for your website. Bluehost offers a free domain for the first year. Then, select a hosting plan that suits your needs and budget. Bluehost offers various plans with different features.
After selecting a plan, complete the registration process and create your Bluehost account. Once your account is set up, log in to your Bluehost control panel. From there, you can install WordPress with just a few clicks using the one-click WordPress installation feature.
Once WordPress is installed, you can customize your website by choosing a theme and adding plugins. Bluehost offers a wide range of free and premium themes to choose from. Additionally, you can enhance your website’s functionality by installing plugins for SEO, security, and more.
Lastly, start creating content for your website. Add pages, blog posts, images, and videos to make your website engaging and informative. You can easily manage your website through the WordPress dashboard. Bluehost provides excellent customer support, so if you have any questions or encounter any issues, you can reach out to their support team for assistance.
By following these steps, you can successfully host your WordPress website on Bluehost and take advantage of their reliable hosting services. Start building your online presence today!