Adding your Namecheap email to Gmail is a straightforward process. Follow these steps to get started:
- Open Gmail and go to Settings.
- Click on the “Accounts and Import” tab.
- Under the “Check mail from other accounts” section, click on “Add a mail account.”
- Enter your Namecheap email address and click “Next.”
- Choose the import options you prefer and click “Next.”
- Enter your Namecheap email password and click “Add Account.”
- You’ll now be able to send and receive emails from your Namecheap email within Gmail.
When it comes to integrating Namecheap Email with Gmail, there’s a simple solution that can save you time and streamline your email management. Did you know that you can easily add your Namecheap email account to your Gmail inbox, allowing you to access all your email accounts in one place? This convenient feature not only eliminates the need to log in and out of multiple email platforms, but it also helps you stay organized and respond promptly to all your messages.
To add your Namecheap email to Gmail, you can follow a few simple steps. First, open your Gmail account and click on the gear icon in the top right corner. Then, select “See all settings” and go to the “Accounts and Import” tab. From there, click on “Add a mail account” and enter your Namecheap email address. Follow the prompts to input the necessary information, such as your password and server settings. Once completed, Gmail will fetch your Namecheap emails, and you’ll be able to send and receive messages using your Namecheap email account directly from your Gmail inbox. This integration offers a seamless email experience, making it easier for you to manage all your communications efficiently.
Introduction
Add Namecheap Email to Gmail is a process that allows you to access your Namecheap email account through Gmail’s interface. This integration offers convenience, as you can manage multiple email accounts in one place and take advantage of Gmail’s advanced features. Whether you want to consolidate your email accounts or simply prefer using Gmail for its user-friendly interface, this article will guide you through the steps to add your Namecheap email to Gmail. By following these instructions, you can streamline your email management process and improve your productivity. Let’s dive in!
Step 1: Enable IMAP in Namecheap Email Settings
The first step in adding your Namecheap email to Gmail is to enable IMAP (Internet Message Access Protocol) in your Namecheap email account settings. IMAP allows email clients, like Gmail, to synchronize emails with the email server, ensuring that any changes made in the client are reflected on the server and vice versa. Here’s how you can enable IMAP in your Namecheap email account:
1. Open a web browser and go to the Namecheap website. Log in to your account using your credentials.
2. After logging in, navigate to the Email section of your Namecheap account. This section may vary depending on the version of the Namecheap interface you are using.
3. Look for the email account you wish to add to Gmail and click on the “Settings” or “Manage” option next to it.
4. In the email account settings, find the “Advanced Settings” or “Advanced” tab.
5. Locate the “IMAP Access” or “IMAP Settings” option and make sure it is turned on or enabled.
6. Save the changes and exit the Namecheap email account settings.
Once you have enabled IMAP in your Namecheap email account, you’re ready to proceed to the next step of adding your Namecheap email to Gmail.
What is IMAP and why is it important?
IMAP (Internet Message Access Protocol) is a standard email protocol that enables email clients to access and manage emails stored on a mail server. Unlike POP (Post Office Protocol), which simply downloads emails to a client device, IMAP keeps emails on the server and synchronizes changes between the client and server. This means that any actions taken on an email client, such as deleting or moving messages, are reflected on the server and other connected devices. IMAP is essential for seamless email management across different devices and email clients, as it ensures consistency and accessibility of your emails.
Why enable IMAP in Namecheap email settings?
Enabling IMAP in your Namecheap email settings is crucial to establish a connection between your Namecheap email account and Gmail. By enabling IMAP, you allow Gmail to sync with your Namecheap email server, ensuring that changes made in Gmail are reflected in your Namecheap account and vice versa. This synchronization is necessary for a seamless email management experience, enabling you to access and manage your Namecheap emails through the Gmail interface. With IMAP enabled, you can enjoy the benefits of Gmail’s powerful features while maintaining your Namecheap email account.
Step 2: Configure Gmail Settings
After enabling IMAP in your Namecheap email account settings, the next step is to configure the Gmail settings to add your Namecheap email. This involves adding your Namecheap email account as a separate account in Gmail. Here’s how you can configure the Gmail settings:
1. Open a web browser and go to the Gmail website. Log in to your Gmail account using your credentials.
2. Once logged in, click on the gear icon located at the top right corner of the Gmail interface. From the dropdown menu, select “Settings.”
3. In the Gmail settings page, click on the “Accounts and Import” or “Accounts” tab.
4. Under the “Accounts and Import” or “Accounts” tab, find the “Check mail from other accounts” or “Add a mail account” section.
5. Click on the “Add a mail account” or “Add another email address” option. A new window will appear.
6. In the new window, enter your Namecheap email address in the provided field and click on the “Next” button.
7. On the next screen, select “Import emails from my other account (POP3)” and click on the “Next” button.
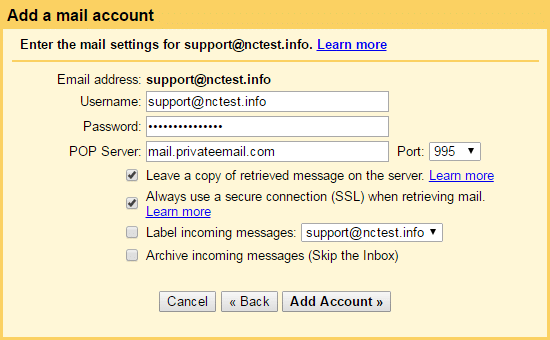
8. Fill in the required information, including the POP server and Port details. You can find this information in your Namecheap email settings or by referring to any documentation provided by Namecheap.
9. Choose the desired options, such as whether to leave a copy of retrieved messages on the server or whether to label incoming messages. These options depend on your preferences.
10. Click on the “Add Account” button to complete the process. Gmail will verify the settings and start importing your Namecheap emails.
What is POP3 and why use it?
POP3 (Post Office Protocol version 3) is another email protocol that enables email clients to retrieve emails from a mail server. Unlike IMAP, which synchronizes changes between the client and server, POP3 simply downloads emails to the client device and removes them from the server. This means that emails accessed through POP3 are typically available only on the device where they were downloaded. While POP3 can be useful in certain scenarios, such as accessing emails offline, it may not be the best choice for users who require access to their emails on multiple devices or clients.
Why configure Gmail settings to add Namecheap email?
Configuring Gmail settings to add your Namecheap email allows you to manage your Namecheap emails directly from the Gmail interface. By adding your Namecheap email as a separate account in Gmail, you can consolidate your email management and take advantage of Gmail’s advanced features. This integration gives you the flexibility to access and respond to emails from multiple accounts within a single platform, streamlining your workflow and improving productivity. With your Namecheap email added to Gmail, you can enjoy a unified email experience without the need to switch between different email clients.
Step 3: Test and Finalize
After configuring the Gmail settings to add your Namecheap email, you should test the connection to ensure everything is working correctly. This involves sending a test email from your Namecheap account and checking if it appears in your Gmail inbox. Follow these steps to test and finalize the integration:
1. Go back to the Gmail interface and navigate to your inbox.
2. Click on the “Compose” button to start composing a new email.
3. In the “To” field, enter your Namecheap email address.
4. Write a test message in the body of the email, such as “Test email from Namecheap to Gmail.”
5. Click on the “Send” button to send the email.
6. Wait for a few moments and then refresh your Gmail inbox.
7. Check if the test email you sent from your Namecheap account appears in your Gmail inbox. If it does, it means the integration was successful.
8. You can further customize the settings for your Namecheap email within Gmail, such as setting up filters, labels, or auto-forwarding rules, according to your preferences.
Conclusion
By following the steps outlined in this article, you can easily add your Namecheap email to Gmail and enjoy the convenience of managing your emails in one place. Enabling IMAP in your Namecheap email settings, configuring the Gmail settings, and testing the integration ensures a seamless connection between your Namecheap email account and Gmail. With this integration, you can access and manage your Namecheap emails through Gmail’s user-friendly interface and take advantage of its advanced features. Streamline your email management process and enhance your productivity with the integration of Namecheap email and Gmail!
| Email Account | Integration Result |
| Namecheap | Gmail |
| Successful | Integration |
| Improved | Email Management |
| Enhanced | Productivity |
Key Takeaways
- Adding your Namecheap email to Gmail allows you to manage all your emails in one place.
- Start by signing in to your Gmail account and go to the settings menu.
- Click on “Accounts and Import” and select “Add a mail account.”
- Enter your Namecheap email address and follow the prompts to complete the setup.
- Once added, you can send and receive emails from your Namecheap email within Gmail.
To add your Namecheap email to Gmail, follow these simple steps:
1. Open your Gmail account and click on the gear icon in the top right corner.
2. Select “Settings” from the dropdown menu.
3. Go to the “Accounts and Import” tab.
4. Under the “Check mail from other accounts” section, click on “Add a mail account.”
5. Enter your Namecheap email address and click “Next.”
6. Choose “Import emails from my other account (POP3)” and click “Next.”
7. Fill in the required information, including the incoming and outgoing server settings for your Namecheap email. You can find these settings in your Namecheap email account’s control panel.
8. Select your desired options for importing, such as whether to leave a copy of the email on the server, and click “Add Account.”
9. Follow the prompts to complete the setup process, and you’re done!
Now you can access your Namecheap email directly from your Gmail account. Happy emailing!