Adding an SPF record to your Namecheap account is an essential step in ensuring the deliverability of your email campaigns. Did you know that without an SPF record, your emails are more likely to end up in the recipients’ spam folder? By adding an SPF record, you can improve the credibility of your email domain and increase the likelihood of your messages reaching the intended recipients.
To add an SPF record in Namecheap, you need to log in to your account and access the DNS management section. From there, you can create a new TXT record and enter the necessary SPF information. It’s important to ensure that your SPF record includes all the authorized mail servers for your domain, as this helps prevent spoofing and improves email authentication. By taking this simple yet crucial step, you can enhance the deliverability and reputation of your email domain.
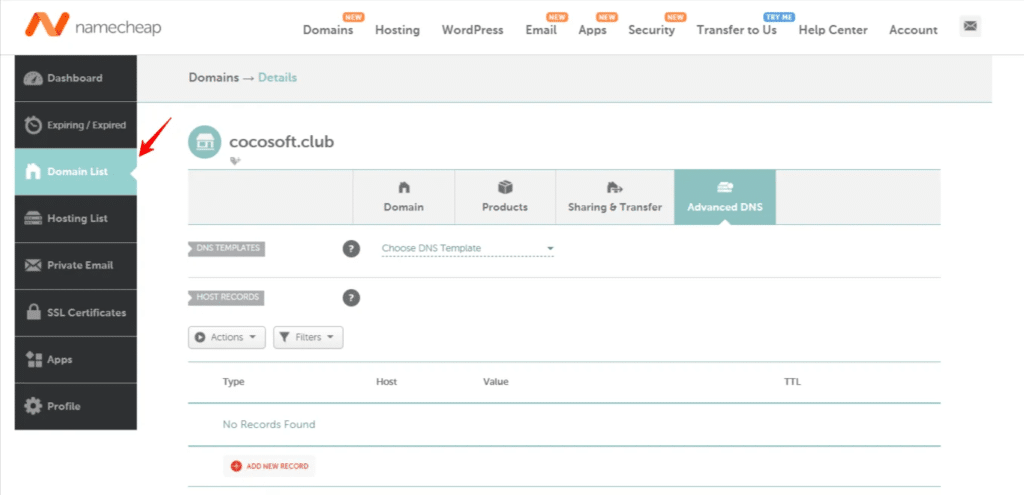
To add an SPF record in Namecheap, follow these steps: 1. Log in to your Namecheap account. 2. Go to the “Domain List” section. 3. Choose the domain you want to manage. 4. Click on the “Advanced DNS” tab. 5. Look for the “Host Records” section and click on “Add New Record.” 6. Select “TXT Record” from the drop-down menu. 7. Enter the desired SPF record in the “TXT Value” field. 8. Save the changes. Your SPF record will now be added in Namecheap.
Understanding SPF Records and Namecheap
When it comes to managing your domain’s email delivery, the Sender Policy Framework (SPF) record is a crucial element. It helps prevent email spoofing and unauthorized use of your domain name by specifying which mail servers are allowed to send emails on behalf of your domain. In this article, we’ll delve into the process of adding an SPF record in Namecheap, one of the leading domain registrars and web hosting providers in the industry.
Before we get into the specifics of adding an SPF record in Namecheap, it’s essential to understand the significance of SPF records and how they function. SPF records are DNS (Domain Name System) records that provide a list of approved IP addresses or hostnames authorized to send emails on behalf of a domain. When an email server receives an incoming message, it checks the SPF record to validate whether the email is from an authorized source.
By implementing an SPF record in Namecheap, you can enhance your domain’s email deliverability, minimize the risk of your emails being flagged as spam or phishing attempts, and protect your domain’s reputation. Now, let’s dive into the step-by-step process of adding an SPF record in Namecheap to optimize your email delivery.
Key Takeaways – How to Add SPF Record in Namecheap?
- SPF records help prevent email spoofing and increase email deliverability.
- To add an SPF record in Namecheap, log in to your Namecheap account and go to the “Advanced DNS” section.
- Create a new TXT record and enter your SPF record value, which includes your email server’s IP address or domain.
- Save the changes and wait for the DNS propagation to complete.
- Verifying the SPF record using online SPF checker tools can ensure it’s set up correctly.
To add an SPF record in Namecheap, follow these simple steps. First, log in to your Namecheap account.
Next, navigate to the “Domain List” page and click on the “Manage” button next to the domain you want to add the SPF record for.
Then, find the “Advanced DNS” section and click on the “Add New Record” button.
In the “Type” drop-down menu, choose “TXT” as the record type.
In the “Host” field, enter “@” to indicate that the SPF record will be added to the base domain.
For the “TXT Value”, paste your SPF record, starting with “v=spf1” followed by the directives you want to include.
Finally, save your changes by clicking on the “Save All Changes” button. Your SPF record will now be added to your Namecheap domain.
This simple process allows you to add an SPF record to your domain in Namecheap, providing better email deliverability and protecting against spam.
Take control of your email deliverability with Namecheap’s easy-to-use DNS management features.