If you want to connect FileZilla to your GoDaddy hosting, follow these steps:
- Open FileZilla and go to “File” -> “Site Manager”.
- Click on “New Site” and enter a name for your connection.
- Under the “Host” field, enter your domain name or the IP address provided by GoDaddy.
- Select “FTP – File Transfer Protocol” as the protocol.
- Choose “Use explicit FTP over TLS if available” as the Encryption option.
- Enter your GoDaddy hosting username and password.
- Click “Connect” to establish the connection.
Connecting Filezilla to Godaddy Hosting is a straightforward process that allows you to easily manage your website files. By using Filezilla, a powerful FTP client, you can efficiently transfer files between your local computer and your Godaddy hosting account with ease. Let’s explore the steps to connect Filezilla to Godaddy Hosting and enhance your website management experience.
To begin, you need to obtain the FTP login credentials provided by Godaddy. These credentials consist of the FTP hostname, username, and password. Once you have these details, open Filezilla and go to the “File” menu, where you select “Site Manager.” In the Site Manager, click on “New Site” and enter a name for your Godaddy hosting connection. Next, input the FTP hostname, choose “FTP – File Transfer Protocol” as the protocol, and select “Use explicit FTP over TLS if available” as the Encryption. Enter the FTP username and password provided by Godaddy, and finally, click on “Connect.” Congratulations, you have successfully connected Filezilla to your Godaddy Hosting account, allowing you to seamlessly manage your website files.
Getting Started with Filezilla and Godaddy Hosting
Connecting Filezilla to your Godaddy hosting is a straightforward process that allows you to easily upload, manage, and transfer files between your local computer and your website’s hosting server. Filezilla is a popular FTP (File Transfer Protocol) client that provides a user-friendly interface for transferring files. Godaddy, on the other hand, is a well-known web hosting provider that offers reliable hosting services. By connecting Filezilla to your Godaddy hosting, you can efficiently manage your website’s files and directories.
To connect Filezilla to your Godaddy hosting, you will need your FTP login credentials, which consist of a hostname, username, and password. These credentials can be found in your Godaddy hosting account’s cPanel or by contacting Godaddy’s customer support. Once you have your FTP login credentials, you can proceed with the following steps to connect Filezilla to your Godaddy hosting:
Step 1: Download and Install Filezilla
The first step to connecting Filezilla to Godaddy hosting is to download and install the Filezilla client on your local computer. Filezilla is available for Windows, Mac, and Linux operating systems and can be downloaded for free from the official Filezilla website. Simply navigate to the Filezilla website and click on the “Download Filezilla Client” button. Once the download is complete, run the installation file and follow the on-screen instructions to install Filezilla on your computer.
After installing Filezilla, launch the program to begin the setup process.
Step 2: Retrieve Your FTP Login Credentials
Before you can establish a connection between Filezilla and your Godaddy hosting, you need to retrieve your FTP login credentials from your hosting account. These credentials include the hostname, username, and password.
To find your FTP login credentials in your Godaddy hosting account’s cPanel, follow these steps:
- Login to your Godaddy account.
- Go to the “My Products” section.
- Locate your hosting package and click on the “Manage” button.
- Scroll down to the “Settings” section and click on “FTP & SSH”.
- You will find your hostname, username, and password under the “FTP Users” section.
If you are unable to find your FTP login credentials, you can contact Godaddy’s customer support for assistance. They will be able to provide you with the necessary information.
Step 3: Connect Filezilla to Godaddy Hosting
Now that you have Filezilla installed on your computer and your FTP login credentials at hand, you can proceed with connecting Filezilla to your Godaddy hosting. To establish a connection, follow these steps:
1. Launch Filezilla on your computer.
2. In the Filezilla interface, click on “File” in the top menu and select “Site Manager” from the dropdown menu. This will open the Site Manager window.
3. In the Site Manager window, click on the “New Site” button.
4. Enter a name for the new site, such as “My Godaddy Hosting”.
5. In the “Host” field, enter the hostname provided in your FTP login credentials. This is usually in the format “ftp.yourdomain.com”.
6. Select “FTP – File Transfer Protocol” as the protocol.
7. Choose “Use explicit FTP over TLS if available” as the Encryption setting.
8. In the “Logon Type” dropdown menu, select “Normal”.
9. Enter your FTP username and password in the respective fields.
10. Click on the “Connect” button to establish a connection between Filezilla and your Godaddy hosting.
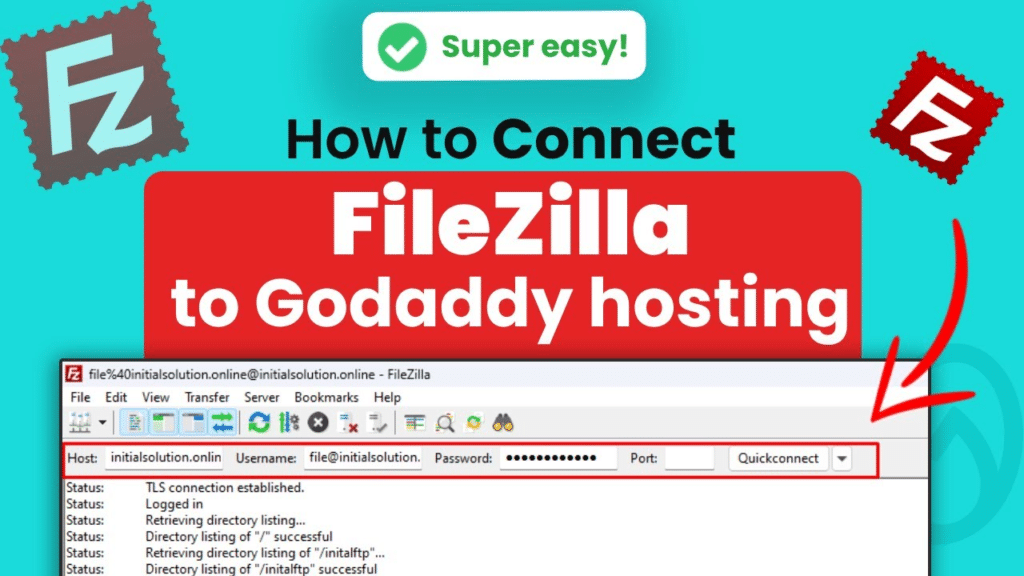
Once successfully connected, you will see the directory structure of your Godaddy hosting server in the Remote Site section of the Filezilla interface. You can now upload, download, and manage files and directories by simply dragging and dropping them between your local computer and the remote server.
Additional Tips and Troubleshooting
Transferring Files with Filezilla
Filezilla offers a straightforward drag-and-drop interface for transferring files between your local computer and your Godaddy hosting server. To transfer files, follow these steps:
- Navigate to the local directory on your computer where the files you want to upload are located.
- In the Local Site section of the Filezilla interface, find the files you want to upload.
- Drag and drop the files from the Local Site section to the Remote Site section to initiate the file transfer.
Filezilla will display the progress and status of the file transfer in the bottom pane of the interface.
Troubleshooting Filezilla Connection Issues
If you encounter any issues while connecting Filezilla to your Godaddy hosting, here are a few troubleshooting tips:
- Double-check your FTP login credentials to ensure they are entered correctly.
- Verify that the hostname is correct and begins with “ftp”.
- Check if your hosting account has any firewall or security settings that may be blocking the connection.
- Try changing the Encryption setting to “Only use plain FTP (insecure)” if the default setting doesn’t work.
- Ensure that your internet connection is stable and working properly.
If the issue persists, you can reach out to Godaddy’s customer support for further assistance.
Conclusion
Connecting Filezilla to your Godaddy hosting allows you to efficiently manage your website’s files and directories. By following the simple steps outlined in this article, you can establish a connection between Filezilla and your Godaddy hosting and easily transfer files between your local computer and the hosting server. Remember to always double-check your FTP login credentials and troubleshoot any connection issues that may arise. With Filezilla and Godaddy hosting, you have a powerful combination for effectively managing your website’s files.
For more information on web hosting and other related topics, visit
Key Takeaways – How to Connect Filezilla to Godaddy Hosting?
- Filezilla is a popular FTP client used to connect to web hosting servers.
- Godaddy is a well-known web hosting provider.
- To connect Filezilla to Godaddy hosting, you need to obtain FTP credentials from Godaddy.
- In Filezilla, enter the FTP server address, username, and password provided by Godaddy.
- Once connected, you can transfer files between your local computer and the Godaddy hosting server.
To connect Filezilla to your GoDaddy hosting, follow these simple steps:
First, download and install Filezilla on your computer. Next, open Filezilla and go to “File” > “Site Manager” to add a new site. Enter your domain name in the “Host” field, choose “FTP – File Transfer Protocol” as the protocol, and enter your FTP username and password. Click “Connect” to connect to your GoDaddy hosting.
Once connected, you can now transfer files between your computer and your GoDaddy hosting by simply dragging and dropping them in Filezilla. Remember to upload your website files to the correct folder (often named “public_html” or “www”) to ensure they appear on your live site. And that’s it! You’re now connected to your GoDaddy hosting using Filezilla.