If you want to connect your Godaddy hosting to another domain, follow these steps:
You have now successfully connected your Godaddy hosting to another domain!
When it comes to connecting Godaddy hosting to another domain, there are a few key steps you need to follow. Whether you’re migrating your website or simply want to use a different domain for your existing hosting, it’s important to understand the process to ensure a smooth transition. Let’s dive in and explore how you can connect Godaddy hosting to another domain.
To connect your Godaddy hosting to another domain, you first need to login to your Godaddy account. From there, you’ll navigate to the hosting section and locate the domain you want to connect. Once you’ve found the domain, you’ll need to update the domain’s DNS settings to point to your Godaddy hosting. This will involve adding Godaddy’s nameservers or updating the DNS records with the correct IP address. By following these steps, you’ll successfully connect your Godaddy hosting to another domain.

Overview of Connecting Godaddy Hosting to Another Domain
If you are looking to connect your Godaddy hosting to another domain, you’ve come to the right place. In this article, we will walk you through the process of connecting your Godaddy hosting to a different domain name. Whether you want to migrate an existing website to a new domain or simply link a new domain to your hosting account, we’ve got you covered. Connecting Godaddy hosting to another domain is a relatively simple process that can be done through the Godaddy dashboard. Let’s dive in and explore the steps involved.
Before we get started, it’s important to have a clear understanding of how Godaddy hosting and domains work together. When you purchase hosting from Godaddy, you are essentially renting server space where your website files and data will be stored. A domain name, on the other hand, is the web address that users type in their browsers to access your website. To connect your hosting to a domain, you need to configure the domain’s DNS settings to point to your hosting account. This ensures that when someone visits your domain, their request is directed to the correct server hosting your website.
To connect your Godaddy hosting to another domain name, you will need access to your Godaddy account and the domain’s DNS settings. Additionally, make sure you have the necessary login credentials and information for both your hosting account and the new domain. Now that we have a basic understanding of the process, let’s move on to the steps involved in connecting Godaddy hosting to another domain.
Step 1: Access Your Godaddy Account
The first step in connecting Godaddy hosting to another domain is to access your Godaddy account. To do this, go to the Godaddy website and click on the “Sign In” button located in the top-right corner. Enter your account credentials and click “Sign In” to proceed. Once you are logged in, you will be taken to your Godaddy account dashboard.
From the dashboard, navigate to the “My Products” section. Here, you will find a list of all the products and services associated with your Godaddy account, including your hosting plans and domain names.
If you already have an existing hosting plan, locate it in the list and click on the “Manage” button next to it. This will take you to the hosting control panel where you can manage your hosting settings. If you have multiple hosting plans, make sure you select the correct one that corresponds to the domain you want to connect.
Step 2: Locate Your DNS Details
In order to connect your hosting to another domain, you will need to locate your DNS details. These details include the nameservers and DNS records associated with your hosting account. The nameservers determine where your domain’s DNS settings are managed, while the DNS records contain information about your website and its associated services.
To find your DNS details, go to the hosting control panel for your Godaddy account. Look for the “DNS Management” or “Manage DNS” section. Here, you will find all the necessary information you need to configure your domain’s DNS settings.
Take note of the nameservers listed in the DNS details. These are usually in the form of “nsX.godaddy.com” or “nsX.secureserver.net” (where X represents a number). You will need to enter these nameservers in the domain’s DNS settings to connect it to your hosting account. Keep this information handy as we move on to the next step.
Step 3: Access the DNS Settings of Your Domain
Now that you have the necessary DNS details from your hosting account, it’s time to access the DNS settings of your domain. This is where you will make the changes to connect your hosting to the new domain.
To access the DNS settings of your domain, go back to your Godaddy account dashboard. Locate the domain you want to connect and click on the “DNS” button next to it. This will take you to the domain’s DNS management page.
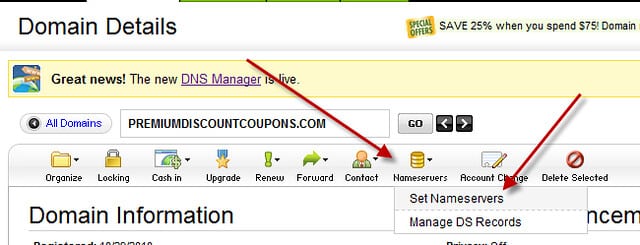
On the DNS management page, you will see a list of different DNS records and settings. Look for the section called “Nameservers” or “DNS Nameservers.” This is where you will need to update the nameservers to connect your hosting to the domain.
Step 4: Update the Nameservers
Now that you have accessed the DNS settings of your domain, it’s time to update the nameservers. Remember the nameservers you noted down earlier from your hosting account? You will need to enter those nameservers in the appropriate fields on the domain’s DNS settings page.
On the domain’s DNS management page, locate the section for nameservers and click on the “Change” or “Edit” button. This will allow you to modify the nameservers associated with the domain.
In the nameserver settings, choose the option to “Enter my own nameservers” or “Custom nameservers.” This will enable you to input the nameservers provided by your hosting account. Enter the nameservers in the provided fields and click “Save” to apply the changes.
Step 5: Wait for DNS Propagation
After updating the nameservers, it may take some time for the changes to propagate across the internet. The process is known as DNS propagation, and it can take anywhere from a few minutes to 48 hours.
During this time, it’s crucial not to make any further changes to the domain’s DNS settings. Making additional changes can disrupt the propagation process and delay the connection between your hosting and domain.
Once the DNS propagation is complete, your Godaddy hosting will be successfully connected to the new domain. Visitors can now access your website using the new domain name, and any changes you make to your hosting account will be reflected on the website.
Conclusion
Connecting Godaddy hosting to another domain is a straightforward process that involves accessing your Godaddy account, locating the DNS details of your hosting plan, accessing the DNS settings of your domain, updating the nameservers, and waiting for DNS propagation. By following these steps, you can easily link your Godaddy hosting to a different domain name and ensure that your website is accessible with the new domain.
We hope this article has provided you with valuable insights and practical advice on how to connect Godaddy hosting to another domain. If you have any further questions or need additional assistance, feel free to reach out to Godaddy’s support team for help. Now, go ahead and connect your hosting to the domain of your choice and enjoy a seamless online presence.
Key Takeaways: How to Connect Godaddy Hosting to Another Domain?
- Connect your GoDaddy hosting to another domain by following these steps.
- Log in to your GoDaddy account and navigate to the “My Products” section.
- Select the hosting plan you want to connect to another domain.
- Click on “Manage” and then “Add Domain” to add the new domain to your hosting account.
- Follow the prompts to complete the domain setup and connect it to your hosting.
To connect your GoDaddy hosting to another domain, you’ll need to follow a simple process. First, log in to your GoDaddy account and navigate to the “My Products” section. Find your hosting plan and click on the “Manage” button.
Next, go to the “Settings” tab and select “Domains” from the dropdown menu. Click on “Add Domain” and enter the domain name you want to connect. Follow the prompts to complete the process, which may involve updating your domain’s DNS settings or pointing it to your hosting account. Once you’ve completed these steps, your GoDaddy hosting will be connected to your new domain.